Step 1: Turn Lightning Experience On!
With the right users set up for Lightning Experience, you’re ready to go live. Fortunately, it’s easy to turn on Lightning Experience using the Lightning Experience Migration Assistant.
From Setup in Salesforce Classic, click Get Started in the Migration Assistant tile at the top of the menu.
 On the Turn It On tab in the Migration Assistant, click the button to switch it to Enabled.
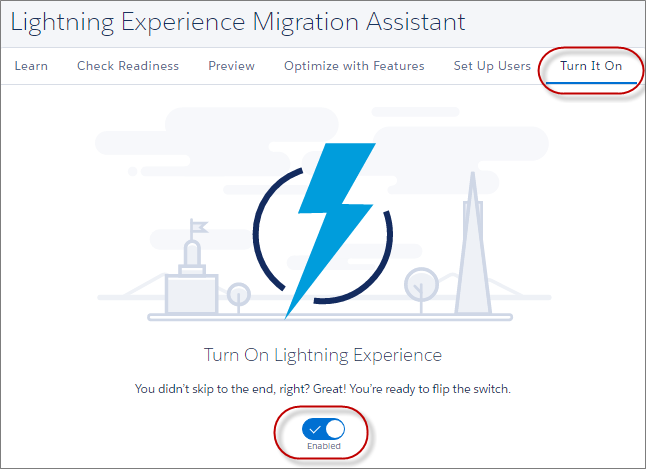
That’s it! The users you’ve enabled and set up to immediately switch to the new interface automatically start enjoying Lightning Experience when their current session refreshes or when they log in. The users you’ve enabled but opted to leave in Salesforce Classic now have access to the Switcher and can switch to Lightning Experience whenever they want.
Switching Between Lightning Experience and Salesforce Classic
Ideally, Lightning Experience meets the needs of everyone in your org. But just in case someone needs access to a feature or tool back in the classic interface, we provide the Switcher. By default, users enabled for Lightning Experience automatically get the Switcher. Which they can use to…wait for it…switch between Lightning Experience and Salesforce Classic whenever they need.
The Switcher is smart. Whenever you switch, it remembers that user experience as your default preference. So if you switch to Salesforce Classic, the classic interface becomes your default preference. If you switch back to Lightning Experience, the new interface becomes your default preference. And so on and so on.
How do you get to the Switcher?
In the Salesforce Classic header, click Switch to Lightning Experience. (The Switcher link is also available from a user’s profile menu.)
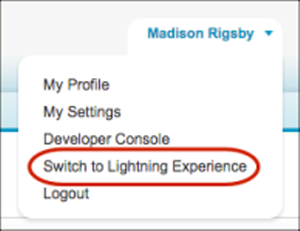
In the Lightning Experience header, click the profile picture and select Switch to Salesforce Classic.

A Few Switcher Gotchas
Switching between Lightning Experience and Salesforce Classic affects the underlying URL routing logic and can lead to some unexpected results when links are resolved. There can be snags with bookmarks and sharing links in emails or Chatter posts—especially if only a subset of your users is enabled for Lightning Experience.
If a user clicks a link to something that’s not supported in Lightning Experience, Salesforce switches to Salesforce Classic in a new tab while the original Lightning Experience window stays open.
Users who aren’t enabled for Lightning Experience can’t access Lightning Experience links, including links posted to Chatter or emailed from a Lightning Experience user.
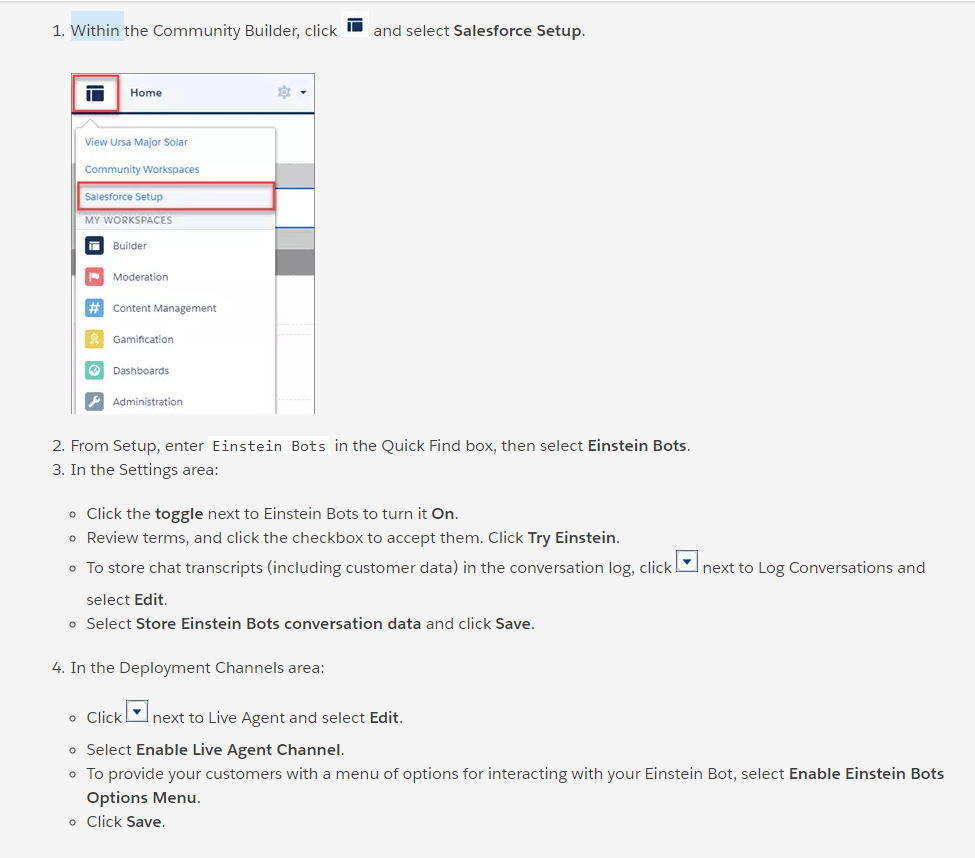
Step 2 : Follow this step to configure einstein bots in your organizations.
https://trailhead.salesforce.com/content/learn/modules/service_bots_basics/enable-einstein-bots
Step 3 : Link Your Einstein Platform Services Account to a Salesforce Org Certificate
After you enable Einstein Bots, Salesforce establishes a new account on Einstein Platform Services. This lets Einstein Bots call into the Einstein Platform Services for Natural Language Processing (NLP)–related tasks. You receive a welcome email shortly after enabling Einstein Bots to let you know the account has been created.
To establish the connection between your Salesforce org and the Einstein Platform, you’ll need to select a certificate to use for this integration. Salesforce uploads the certificate to the Einstein Platform automatically once you take these steps.
1. From Setup, enter Certificate and Key Management in the Quick Find box, then select Certificate and Key Management.
2. Click Create Self-Signed Certificate and enter the details:
- Label: BotCert
- Unique Name: BotCert
3. Click Save.
Step 4 : Create a New Einstein Bot
You’re well on your way to creating a chatbot to support Ursa Major Solar’s customers. Ready to create your first bot?
From Setup, enter Einstein Bots in the Quick Find box, then selectEinstein Bots
Click New
Review the welcome screen and click Next. A setup wizard walks you through a few screens to gather basic information about the bot, including:
Bot Name
Greeting
Main Menu Options
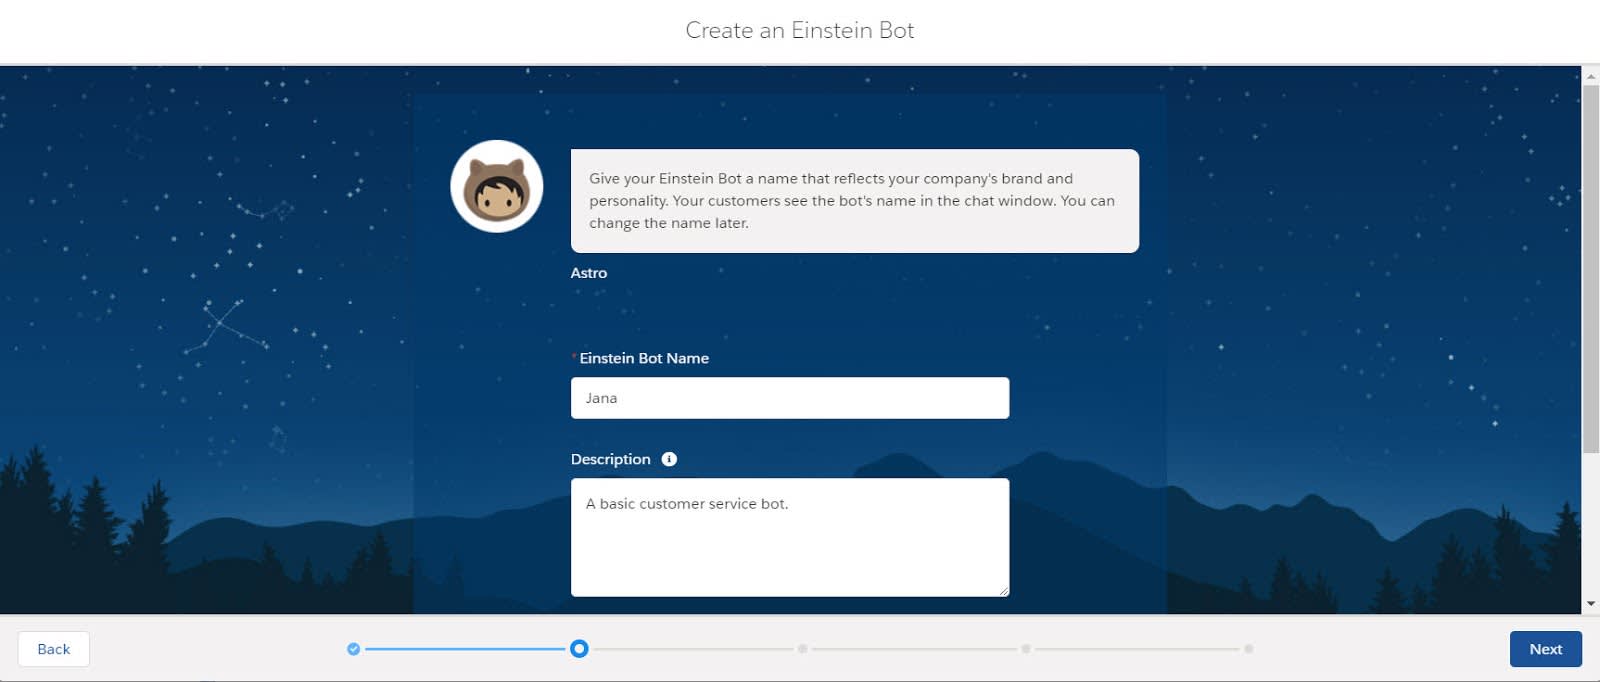
Let’s name our Einstein Bot Jana and enter this description: A basic customer service bot.
Click Next.
 Enter a greeting message that identifies your bot by name and makes it clear that it’s not a human. For example: Hi! I’m Jana the customer service chatbot. How can I help you?
Click Next.

Set up a menu for your customers with common issues or questions you want your bot to handle. Let’s enter Order Related in Menu Item 1 for any questions related to a customer’s order. Let’s add Appointment Related in Menu Item 2 for any questions related to scheduling.
Click Create to build your bot.

Click Finish.
Step 5 : Meet the Bot Builder
You’ve built your bot, and you should now be on the Einstein Bot Builder overview page. It includes the bot’s name and description, a place to train your bot to recognize what customers want, and settings that let you customize the bot response delay time. Let’s take a minute to get acquainted with this page.
Click next to Overview.
 In this project, we work within the Dialogs, Entities, and Variables tabs.

Select Dialogs
.
This is the Dialog page. Dialogs are conversation snippets that control what a bot can do.
These are the prebuilt dialogs (1). Notice that Welcome is set as the “Home” dialog. This indicates where the bot always starts. We don’t work with “Confused” in this project—just know that it’s a fallback mechanism for when a bot cannot identify what a customer would like to do (also known as intent).
You see that the bot wizard set up our welcome Message (2) and created the Next Step (3) flow to our Main Menu. This section is where we indicate the next step after this dialog. You can set it to Show a menu, Start another dialog, Transfer to an agent, or Wait for customer input, which implies you will use NLP to identify customer intent and start the next dialog.
After the Welcome dialog, the bot immediately goes to the Main Menu dialog (4).
Notice the additional dialogs (5) we created during setup.
If you click the between the Message and Next Step sections, you can see that dialogs are built from:
- Messages—communicate information to the customer using text.
- Questions—ask for customer input and store that information.
- Actions—call Apex code with parameters to retrieve, update, save, and run processes related to your data in Salesforce.
- Rules—make runtime decisions based on customer data.

This project does not include Actions and Rules because they go beyond the scope of an admin’s role.

